Did you know indoor air can be 2 to 5 times more polluted than outdoor air? Considering we spend about 90% of our time indoors, testing air quality is vital for health. From invisible dangers like radon and carbon monoxide to everyday pollutants like VOCs and particulate matter, understanding what’s in your air helps you take control.
Here’s what you’ll learn:
- Common indoor pollutants like mold, CO₂, and VOCs, and their risks.
- Outdoor hazards like PM2.5, ozone, and vehicle emissions.
- Tools for air quality testing, from affordable DIY kits to advanced monitors.
- Simple ways to interpret results and improve air quality.
- How professional ozone treatments tackle persistent issues.
Whether for your home, workplace, or outdoor environment, testing gives you actionable insights to breathe cleaner, safer air.
Is Your Home’s Air Healthy? How to Do an Indoor Air Quality Check (and Improve It!
sbb-itb-5fea4da
Common Air Pollutants You Need to Test For
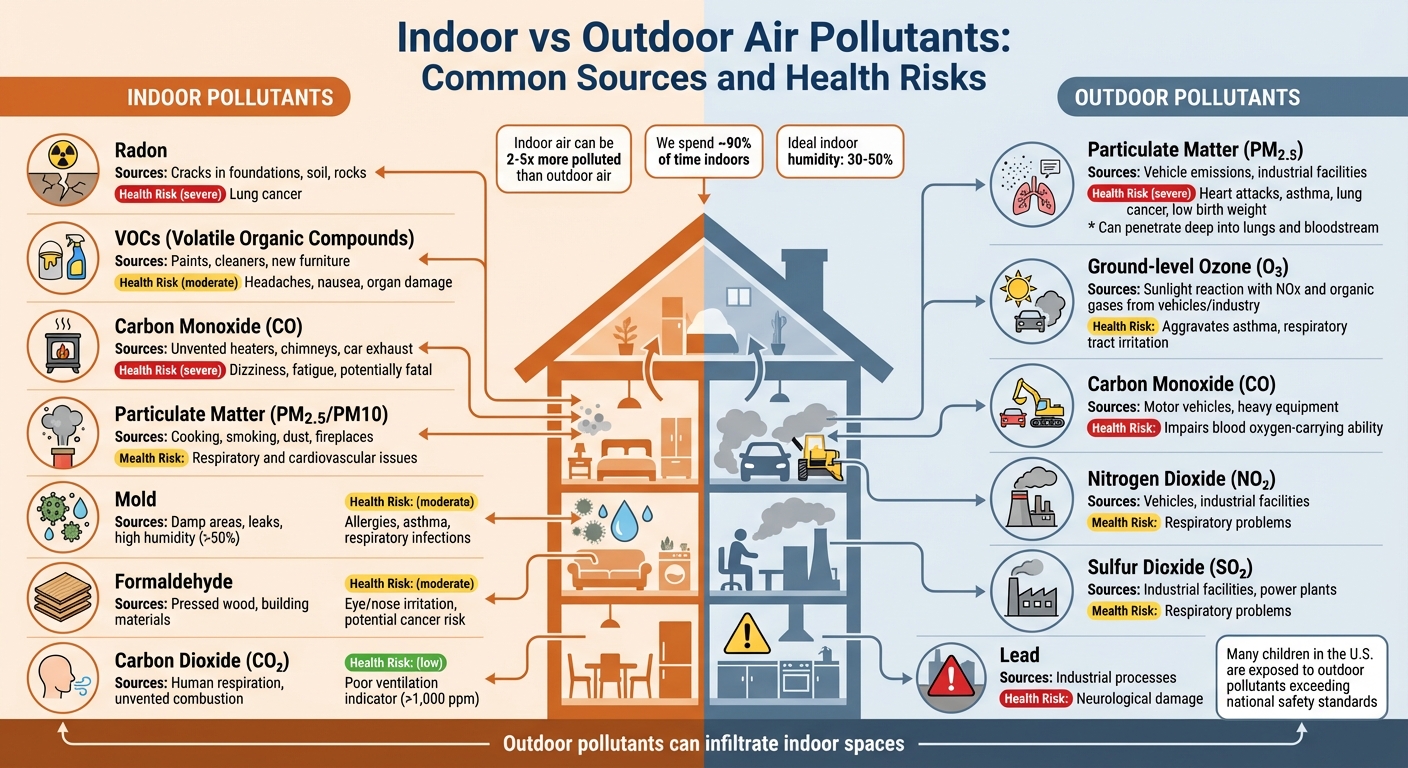
Indoor vs Outdoor Air Pollutants: Common Sources and Health Risks
Pollutants vary significantly between indoor and outdoor environments due to different sources and associated risks.
Indoor Pollutants: CO₂, TVOCs, and Other Contaminants
Volatile Organic Compounds (VOCs) are chemicals released by everyday household items like paints, cleaning products, and furniture. Prolonged exposure can lead to symptoms such as headaches, nausea, or even organ damage .
Radon, a radioactive gas, naturally seeps into buildings through cracks in foundations or walls that are in contact with the ground. Since radon is both odorless and invisible, regular testing – ideally every two years – is essential .
Combustion byproducts, including carbon monoxide (CO), nitrogen dioxide (NO₂), and particulate matter (PM), are produced by fuel-burning appliances like stoves, heaters, and fireplaces. Carbon monoxide is particularly hazardous – it can cause dizziness, fatigue, and nausea at moderate levels, and exposure to high concentrations can be fatal.
Biological contaminants such as mold, dust mites, pet dander, and pollen thrive in damp, poorly ventilated spaces. Mold, for example, can trigger allergies, asthma, and respiratory infections. Keeping indoor humidity between 30% and 50% helps limit mold growth and control dust mites .
Particulate Matter (PM2.5 and PM10) comes from activities like cooking, burning candles or incense, tobacco smoke, and outdoor pollution that enters the home. Meanwhile, carbon dioxide (CO₂) – produced by human respiration and unvented combustion appliances – acts as a key indicator of ventilation quality. Elevated CO₂ levels often suggest poor air circulation.
| Pollutant | Common Sources | Health Risks |
|---|---|---|
| Radon | Cracks in foundations, soil, rocks | Lung cancer |
| VOCs | Paints, cleaners, new furniture | Headaches, nausea |
| Carbon Monoxide | Unvented heaters, chimneys, car exhaust | Dizziness, fatigue, potentially fatal |
| Particulate Matter | Cooking, smoking, dust, fireplaces | Respiratory and cardiovascular issues |
| Mold | Damp areas, leaks, high humidity | Allergies, asthma, respiratory infections |
| Formaldehyde | Pressed wood, building materials | Eye/nose irritation, potential cancer risk |
Next, let’s shift focus to the primary pollutants affecting outdoor air quality.
Outdoor Pollutants: Particulate Matter, CO, and Ozone
The EPA identifies six major outdoor pollutants: particulate matter, ground-level ozone, carbon monoxide, sulfur dioxide, nitrogen dioxide, and lead . Among these, particulate matter and ground-level ozone pose the most common challenges.
Particulate Matter is categorized into two sizes. Fine particles (PM2.5) are particularly concerning because they can penetrate deep into the lungs and even enter the bloodstream, potentially causing heart attacks, asthma, lung cancer, and low birth weight. Larger particles (PM10), on the other hand, tend to irritate the eyes, nose, and throat.
"Smaller particles, called PM2.5, are more dangerous because they can get into the deep parts of your lungs – or even into your blood."
– CDC
Ground-level ozone is created when sunlight reacts with nitrogen oxides and organic gases emitted by vehicles and industrial facilities . This pollutant aggravates respiratory conditions like asthma and irritates the respiratory tract. Similarly, carbon monoxide, primarily from motor vehicles and heavy equipment, impairs the blood’s ability to carry oxygen. Nitrogen dioxide and sulfur dioxide also contribute to respiratory problems .
Recent studies indicate that many children in the U.S. are exposed to outdoor pollutants exceeding national safety standards. Since outdoor pollutants can infiltrate indoor spaces, understanding both types is crucial for a thorough air quality evaluation .
Air Quality Testing Equipment and Tools
Selecting the right air quality testing tools depends heavily on whether you’re focusing on indoor or outdoor environments. Each setting comes with unique challenges that require specific sensor technologies.
Indoor Air Quality Monitors
Indoor air quality monitors typically measure pollutants like CO₂, PM2.5, and VOCs. Entry-level models that cover these basics are priced between $70 and $100, while more advanced devices with additional sensors for radon, formaldehyde, and carbon monoxide range from $150 to $350.
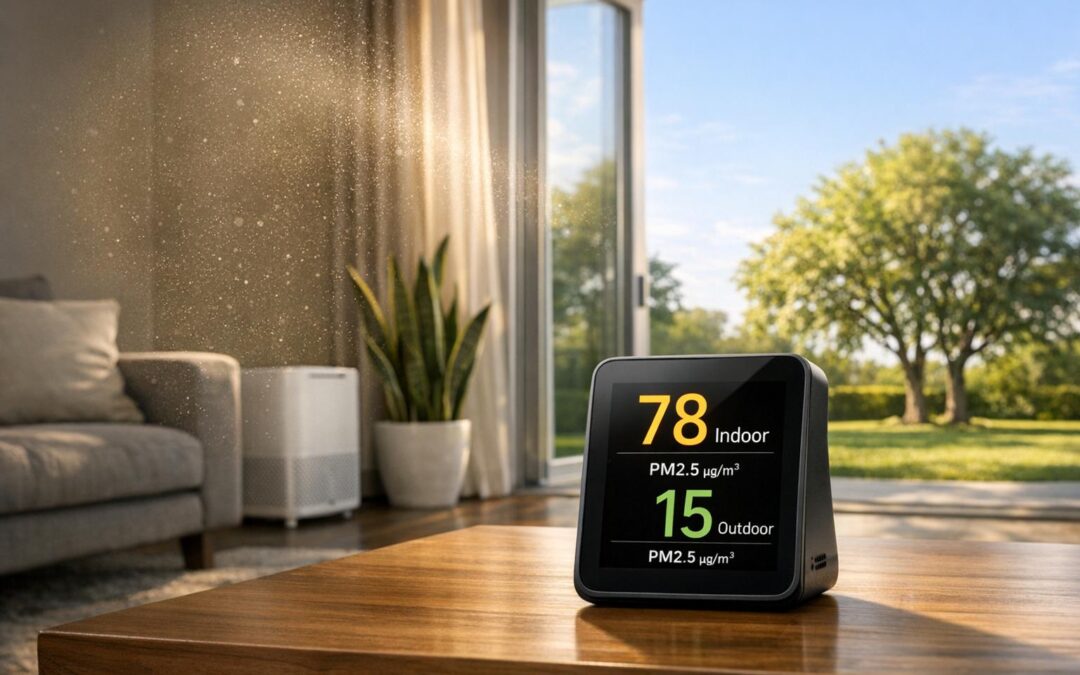
For accurate CO₂ readings, prioritize monitors equipped with NDIR (Non-Dispersive Infrared) sensors. Many modern devices also offer WiFi or Bluetooth connectivity, enabling users to track historical data through smartphone apps and receive real-time alerts if air quality worsens. Some models even feature color-coded LED indicators – green, yellow, and red – to provide instant feedback. Advanced monitors can integrate with smart home systems, allowing them to automatically manage air purifiers or adjust HVAC settings when pollutant levels rise.
"At a minimum, you want an air quality monitor that measures carbon dioxide, fine particulate matter [PM2.5], and VOCs. Those are the most common indoor air pollutants." – Bernie Deitrick, Test Engineer, Consumer Reports
When placing your monitor, keep it at breathing height (3–6 feet above the floor) and away from windows, vents, stoves, or humidifiers to avoid skewed readings. A simple way to test your CO₂ sensor is by exhaling directly onto it – since human breath contains about 4% (40,000 ppm) CO₂, this should cause a noticeable spike. While consumer-grade monitors are portable and relatively affordable, they lack the precision of commercial-grade equipment, which can cost upwards of $100,000 and is generally used for government or scientific monitoring.
Now, let’s shift focus to tools built for monitoring outdoor air quality.
Outdoor Air Quality Testing Tools
Outdoor air quality monitors are designed to track pollutants like ozone (O₃), nitrogen dioxide (NO₂), and sulfur dioxide (SO₂), which differ from the carbon dioxide and VOCs typically measured indoors. These devices are housed in IP66-rated enclosures to withstand harsh weather conditions, including rain, dust, and extreme temperatures. Unlike indoor monitors, outdoor units often rely on cellular connectivity – such as GSM, LTE, LoRaWAN, or NB-IoT – for remote data transmission.
Some highly regarded outdoor tools include the Oizom Polludrone for smart city monitoring, DustTrak DRX/II handheld aerosol monitors for spot checks, and the PurpleAir Zen, which functions both indoors and outdoors. In 2025, Oizom conducted a collocation study in Mumbai, India, comparing its Polludrone with a reference station maintained by the Maharashtra Pollution Control Board. The Polludrone achieved an R² value of 0.97 for carbon monoxide and 0.94 for ozone and nitrogen dioxide, meeting US EPA Tier III and IV precision standards for personal exposure monitoring.
For ozone detection in outdoor settings, metal oxide semiconductor (MOS) sensors are recommended for their accuracy at low ambient levels (below 0.1 ppm). In contrast, electrochemical (EC) sensors are better suited for indoor ozone monitoring, as they are less affected by VOC interference. Handheld devices like the DustTrak are particularly useful for quick investigations – whether responding to HVAC odor complaints or checking air quality near construction sites – before committing to permanent monitoring solutions.
How to Test Air Quality
Indoor Testing Techniques
Testing indoor air quality effectively starts with careful preparation. Begin by closing all windows and doors for 24 hours to ensure the sample reflects indoor conditions without outdoor interference.
Position your testing device at breathing height – about 3 to 6 feet off the ground – and keep it away from corners, vents, or areas like kitchens that might skew results. Let the device run for at least an hour to account for short-term variations. If you’re using DIY kits for specific contaminants like radon or mold, you may need to leave them in place for several hours or even days.
Follow the manufacturer’s calibration instructions, and keep a record of the test’s date, time, room location, and any household activities taking place. To get a complete picture, start by testing under normal conditions to establish a baseline. Then, test during activities like cooking or cleaning to observe any spikes in pollutants. However, avoid testing right after activities like painting, installing new furniture, or heavy cleaning, as these can temporarily increase VOC levels.
"Placing the device at breathing height ensures you’re capturing pollutant levels most relevant to what your family is inhaling." – Purified Air Duct Cleaning
Once you’ve completed indoor testing, you’re ready to move on to outdoor air quality assessments, which require a different approach.
Outdoor Testing Techniques
Outdoor air quality testing involves unique methods designed to measure the ambient air you’re exposed to daily. Like indoor testing, sensor placement is key.
Position sensors at breathing height (3 to 6 feet) in open spaces, away from obstructions like buildings, fences, or thick vegetation. Steer clear of localized pollution sources such as grills, smoking areas, or idling cars. Similarly, avoid placing sensors near trees or shrubs, which can filter particles or interact with ozone, altering the readings. Ensure the sensors are at least 3 feet off the ground to avoid interference from water splashes or ground-level effects, and clean solar panels regularly to maintain consistent power.
To verify your sensor’s accuracy, use a technique called collocation – place your sensor within 20 meters (about 65 feet) of a regulatory-grade reference monitor and compare the data. Document the setup by taking photos of the sensor’s placement and nearby features like roads, vents, or other landmarks. This can help interpret the data later. Review time-series data for spikes; random spikes might indicate power issues, while routine patterns could stem from cyclic sources like HVAC systems.
Understanding Your Air Quality Test Results
Reading and Analyzing Your Data
To make sense of your air quality test results, start by comparing them to established safety guidelines. Many air quality reports use a color-coded system to indicate risk levels: green means safe, yellow suggests caution, and red signals hazardous conditions. For example, PM2.5 levels under 12 μg/m³ are generally safe, while levels between 33 and 55 μg/m³ can be risky for people with respiratory issues. Anything above 55 μg/m³ is considered unhealthy for everyone. Similarly, CO₂ levels exceeding 1,000 ppm indicate poor ventilation, and TVOC levels should ideally stay below 500 μg/m³. If TVOCs exceed 1,000 μg/m³, it may point to a significant pollution source.
It’s also important to compare indoor air quality to outdoor conditions. If your indoor PM2.5 levels rise and fall in sync with outdoor pollution spikes – like during rush hour or wildfire events – it’s likely that outdoor pollutants are entering your home. However, if indoor levels remain high while outdoor air is relatively clean, the pollution source is likely internal, such as cooking, cleaning products, or off-gassing from furniture.
"Indoor air can be two to five times more polluted than the air outside. In some homes, that number is drastically higher." – Purified Air Duct Cleaning
Here’s a quick reference table to help interpret your air quality data:
| Metric | Safe/Target Range | What High Levels Mean |
|---|---|---|
| PM2.5 | < 12 μg/m³ | Cooking smoke or outdoor pollution infiltrating |
| CO₂ | < 1,000 ppm | Poor ventilation; inadequate fresh air exchange |
| TVOCs | < 500 μg/m³ | Off-gassing from cleaners, new furniture, or paint |
| Humidity | 30% – 50% | Too high: mold risk; too low: respiratory irritation |
| CO | < 9 ppm | Appliance malfunction; evacuate if >100 ppm |
Use this information to pinpoint problem areas and make targeted changes.
Taking Action Based on Test Results
Once you’ve identified issues, it’s time to act. For high PM2.5 levels, consider running your kitchen exhaust fan on a higher setting while cooking, avoiding candles or incense, and using HEPA air purifiers in rooms you use most often. If outdoor pollution is the culprit, keep windows closed during high-smog periods or wildfire events, and upgrade your HVAC filter to something like a MERV 11 or 13 filter.
For rooms with consistently high CO₂ levels, open windows or use mechanical ventilation for 10–15 minutes a few times a day. If TVOCs spike after cleaning or when new furniture is introduced, switch to low-VOC products, improve ventilation, and consider using activated carbon filters to trap gaseous pollutants.
To manage humidity, use a dehumidifier and run exhaust fans during showers if levels exceed 50%. If humidity drops below 30%, adding a humidifier can help reduce respiratory discomfort. For carbon monoxide concerns, inspect fuel-burning appliances immediately and make sure CO detectors are installed on every floor of your home.
"The true power of testing lies in using the results to make smart, targeted improvements." – Purified Air Duct Cleaning
If radon levels hit or exceed 4.0 pCi/L, it’s critical to contact a certified radon mitigation specialist to install proper ventilation. For mold issues, address the root cause of moisture – like fixing leaks or improving drainage – before tackling visible mold growth. Retesting your air quality every three to six months, or after major changes like renovations or flooding, ensures that your efforts are effective.
Professional Ozone Treatment for Better Air Quality
Advanced ozone treatment offers an effective way to tackle persistent airborne contaminants after analyzing your air test results.
How Ozone and Hydroxyl Technology Work
Professional ozone and hydroxyl treatments go beyond routine air quality testing and cleaning methods. These technologies produce powerful disinfectants that eliminate bacteria, viruses, and odors at the molecular level, rather than just masking them. Unlike traditional cleaning, which relies on detergents or chemical sprays, ozone and hydroxyl generators use naturally occurring elements to sanitize the air and exposed surfaces simultaneously.
This process is entirely chemical-free, leaving no residues behind. Once the treatment is complete, ozone or hydroxyl breaks down into oxygen, making it highly effective for removing stubborn odors that regular cleaning often can’t handle. These include odors from tobacco, marijuana, burnt food, pet urine, curry, and chemical vapors. The treatment also penetrates hard-to-reach areas, such as inside cabinets, drawers, and porous materials like upholstery and carpets.
"Our generators create powerful disinfectants that break down organic substances at the molecular level, destroying bacteria, viruses, and odors. The process leaves no harmful residues behind, requiring no additional cleanup." – Ozonated Cleaning LLC
Before treatment, it’s essential to eliminate the source of the odor, such as garbage, mold, or dead rodents. Humidity control is also critical – basement treatments, for example, require humidity levels below 45%, as levels of 50% or higher can reduce the treatment’s effectiveness. During the process, the space must be entirely vacated, and most areas are safe to re-enter within 24 hours.
Ozonated Cleaning LLC Services
Ozonated Cleaning LLC specializes in professional ozone and hydroxyl treatments, serving both residential and commercial clients in the Chicagoland area. Their services cover a wide range of spaces, from single vehicles to offices as large as 10,000 square feet. Pricing starts at $150 for vehicles, $200 for semi-trucks, and $600–$900 for homes, depending on their size.
The company handles odor removal and disinfection for homes, businesses, gyms, hotels, restaurants, healthcare facilities, RVs, and boats. They operate across Chicago and its suburbs, including Naperville, Aurora, Joliet, Elgin, and Schaumburg, with extended service areas reaching Northwestern Indiana and Southeastern Wisconsin.
Most treatments require just one session to achieve complete disinfection and odor removal. Technicians assist with preparation, such as opening all interior doors, cabinets, and drawers to ensure proper circulation, and they provide clear instructions on safe re-entry times. This environmentally friendly approach is ideal for spaces where harsh chemicals are not an option. To learn more or schedule a treatment, visit ozonatedcleaning.com.
Conclusion
Testing your air quality – both indoors and outdoors – is the first step to creating a healthier living or working space. This guide outlines tools and techniques to suit a variety of budgets:
- DIY kits (priced around $15–$150) are great for initial checks on specific pollutants.
- Smart monitors (ranging from $100–$300+) provide continuous data, helping you track how daily activities impact air quality.
- For more complex issues, professional testing services ($200–$1,000+) offer detailed analysis to pinpoint pollution sources and develop targeted solutions.
This flexibility allows you to choose a testing approach that fits both immediate needs and ongoing air quality management.
Once you’ve identified the problem areas, take action right away. The most effective method is source control – removing or reducing pollution sources. This might include fixing water leaks, discarding old chemicals, or addressing off-gassing furniture. Boost ventilation by opening windows regularly, and consider upgrading to MERV 11 or 13 HVAC filters to reduce allergens and particulate matter significantly.
For stubborn odors or more intensive cleaning needs, professional ozone and hydroxyl treatments offer a chemical-free solution. Ozonated Cleaning LLC, serving the Chicagoland area, specializes in eliminating bacteria, viruses, and persistent odors at the molecular level. Their services start at $150 for vehicles and range from $600–$900 for residential spaces. These treatments complement regular testing and monitoring, offering a thorough approach to improving air quality.
FAQs
Which pollutants should I test for first?
Testing for the most concerning pollutants is a smart first step in tackling indoor air quality issues. Focus on volatile organic compounds (VOCs), which often come from household products, mold spores that thrive in damp environments, and radon, a radioactive gas associated with lung cancer. By starting with these, you can pinpoint the most pressing air quality problems and take meaningful steps to create a healthier living space.
How often should I retest my indoor air?
It’s a good idea to retest your indoor air every 6 to 12 months, particularly if earlier tests revealed concerns like VOCs, mold, or radon. If you start noticing persistent odors, health issues, visible mold, or major changes in your surroundings, consider testing sooner. Regular checks ensure you can tackle air quality problems as they arise.
When should I hire a pro instead of DIY testing?
If you’re dealing with complex situations like chemical spills, wildfire aftermath, or suspect pollutants that require specialized tools, it’s best to hire a professional. Persistent issues like strong odors, mold growth, or unexplained health problems also call for expert air quality testing to ensure accurate results. Professionals are particularly helpful for ongoing monitoring or verifying the performance of air purification systems, as DIY kits often miss certain pollutants or fail to provide detailed information.
Recent Comments