Ozone generators are a powerful tool for removing mold odors, especially in hard-to-reach places like walls, fabrics, and HVAC systems. These devices use ozone (O₃) to oxidize and neutralize odor-causing molecules and airborne mold spores. However, they are not a one-size-fits-all solution. Here’s what you need to know:
- What They Do: Ozone eliminates odors by breaking down volatile organic compounds (VOCs) and mold spores at a molecular level. It reaches areas traditional cleaning methods can’t.
- What They Don’t Do: Ozone can’t remove physical mold colonies or fix the moisture problems that cause mold. Addressing leaks, humidity, and visible mold is essential before treatment.
- Safety First: Ozone is harmful to humans, pets, and plants during treatment. Proper precautions, such as sealing the area and ventilating afterward, are critical.
- Best Use Cases: Ozone treatment works as a final step after cleaning and fixing moisture issues, ensuring long-lasting results.
To safely and effectively use ozone generators, follow strict guidelines, including clearing the area, using the correct ozone concentration, and ventilating thoroughly after treatment. For complex cases, professional services may be a better option.
How Ozone Generators Remove Mold Odors
The Science Behind Ozone and Odor Removal
Ozone works by oxidizing odor molecules, permanently breaking them down. When ozone (O₃) comes into contact with mold spores or volatile organic compounds (VOCs) responsible for musty odors, its extra oxygen atom separates and binds to the odor-causing molecule. This reaction alters the molecule’s structure, effectively eliminating the smell.
"Ozone reacts with odor molecules by transferring the ‘extra’ oxygen atom of the ozone molecule to the odor molecule, changing its composition so it no longer has the same chemical makeup." – David Hart, Founder and CEO, RamAir International
Unlike air fresheners that simply cover up odors or ionizers that trap particles, ozone destroys odors at their source by chemically altering bacteria and VOCs. Once the oxidation process is complete, ozone reverts to regular oxygen (O₂), leaving no lingering chemical residue. This makes ozone especially effective in areas that are hard to clean, such as fabrics, wall cavities, and HVAC systems – places where liquid cleaners often can’t reach.
Ozone can also neutralize airborne mold spores, reducing the chances of them sprouting and causing new odor issues. However, achieving this requires specific ozone concentrations. Studies indicate that 0.3 ppm for 5 minutes (a CT factor of 1.5) is sufficient to neutralize fungi, mold, and yeasts, whereas bacteria need only 0.1 ppm for 1 minute.
While ozone is highly effective at neutralizing odors, its role is limited to addressing odors and spores.
What Ozone Cannot Do for Mold Problems
Although ozone is effective at eliminating odors, it has clear limitations. It does not remove physical mold colonies embedded in porous materials like drywall, insulation, or carpeting. Additionally, it cannot eliminate mycotoxins – harmful compounds produced by certain molds, such as Stachybotrys – which often require specialized cleaning or material replacement.
"Ozone will eliminate the odor, and it will kill/stop the mold spores from sprouting, but it is not a viable option for getting rid of all of the mold." – Oxidation Technologies
Ozone treatment also doesn’t address the root cause of mold growth: moisture. Problems like leaks, condensation, or high humidity (over 60%) must be resolved to prevent mold from returning. If these issues aren’t fixed, both the mold and its accompanying odors will reappear. Ozone should be viewed as a final step in the process, following repairs and the removal of mold-contaminated materials. Without addressing these underlying issues, any odor removal will only be temporary.
sbb-itb-5fea4da
Preparing for Ozone Treatment
Clearing the Area and Setting Up Ventilation
Before starting ozone treatment, follow the "3 P’s" rule: remove all people, pets, and plants from the area. Even small amounts of ozone can irritate animals’ respiratory systems and harm plant cells.
Seal the space by closing all windows and doors once the area is cleared. For specific treatments, cover furniture with a tarp or place smaller items in sealed plastic containers. For whole-house treatments, remove the HVAC filter and set the system fan to "always on" to circulate ozone effectively. Use duct tape and cardboard to seal vents, air intakes, and gaps under doors to keep ozone from escaping into other areas.
Finding the Source of Mold Odors
While ozone generators can neutralize odors and kill airborne mold spores, they won’t solve the problem if moisture issues remain. Ozone removes odors but doesn’t fix moisture problems. Check damp spaces like bathrooms, basements, laundry rooms, and areas near windows or vents. Mold often grows on materials like drywall, carpets, cabinetry, and even concrete.
"To completely get rid of the mold odor, you need to eliminate the source of the odor." – Oxidation Technologies
Address the root cause of mold by repairing leaks and cleaning affected surfaces before using ozone. If insulation, drywall, or other materials are heavily contaminated, they should be replaced – ozone cannot penetrate deeply enough to treat such materials effectively. Also, ozone cannot pass through walls, so if mold is suspected behind drywall, the wall must be opened up before treatment.
Equipment and Supplies Needed
To effectively remove biological odors like mold, use an ozone generator with an output of 2,000 to 6,000 mg/hr for standard rooms. For larger spaces, like entire duct systems, consider units with outputs up to 28,000 mg/hr. Run a dehumidifier beforehand to dry out the area – ozone works best in dry conditions, and keeping indoor humidity below 60% helps prevent mold from returning.
Additional supplies include:
- Extension cords
- A handheld ozone monitor to measure concentrations and confirm when it’s safe to re-enter
- Materials like duct tape and cardboard for sealing the area
- Enzyme-based cleaning solutions to break down bacteria and organic residues before starting the ozone cycle
Protect sensitive items such as electronics, rubber, and synthetic fabrics (e.g., polyester, nylon, spandex) by covering them with plastic sheeting. High ozone levels can damage these materials. Use a timer – either built into the generator or an external one – to ensure the machine shuts off as scheduled.
"Ozone treatment should be the last step performed after cleaning and detailing." – Detail King
Once the area is ready and all supplies are in place, you can move on to setting up the ozone generator in the next steps.
What Ozone Can and Cannot Do
Understanding how ozone machines remove home odors is essential for managing expectations during mold remediation.
How to Use an Ozone Generator: Step-by-Step
Ozone Treatment Times and Safety Standards for Mold Odor Removal
Setting Up the Ozone Generator
Start by placing the ozone generator in a central location to ensure better air circulation throughout the space. To enhance the process, use additional fans to help push ozone into porous materials like carpets and upholstery. While ozone is highly effective, some restoration professionals compare ozone vs hydroxyl to determine the safest approach for occupied spaces. Before turning the machine on, make sure the area is completely cleared of people, pets, and plants. Seal off any openings like doors and windows to prevent ozone from escaping into other areas.
For standard rooms with mild to moderate odors, run the generator for about two hours. If you’re dealing with severe mold issues or treating larger areas, you may need to extend the runtime. Use the built-in timer on the generator or an external timer to avoid entering the space while the ozone is active. Always wear protective gear when handling the equipment to ensure safety.
"It only takes 3-4 PPM to kill off all germs, including MOLD, Bacteria, and Viruses." – Allergy Purifiers LLC
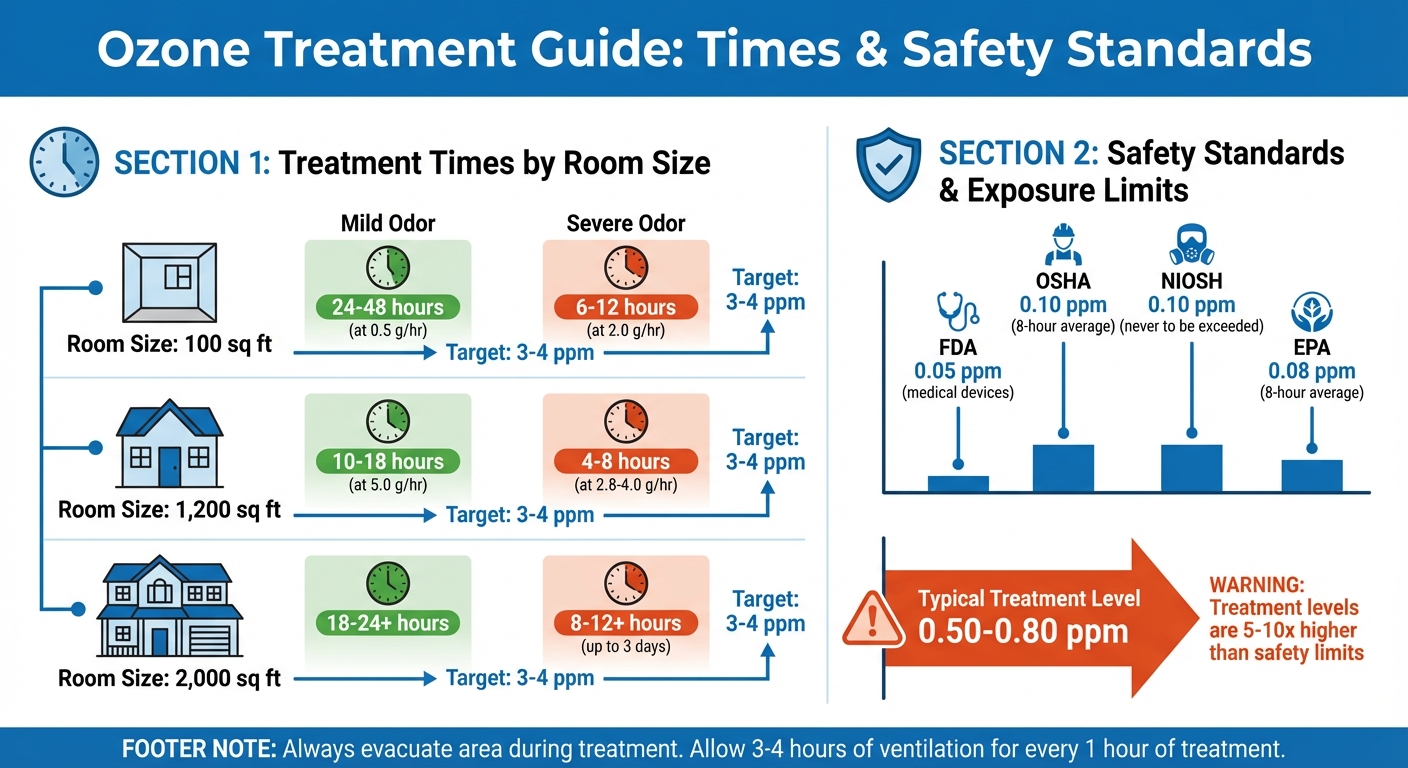
Treatment Times by Room Size and Odor Severity
The amount of ozone and the treatment duration depend on the size of the room and the intensity of the odor. For commercial-grade applications, aim for 0.5–2 grams of ozone per hour for every 100 square feet. To effectively effectively eliminate mold, bacteria, and viruses, maintain an ozone concentration of 3–4 parts per million (ppm).
| Room Size (sq ft) | Mild Odor Duration (hours) | Severe Odor Duration (hours) | Target Ozone Concentration (ppm) |
|---|---|---|---|
| 100 | 24–48 (at 0.5 g/hr) | 6–12 (at 2.0 g/hr) | 3–4 |
| 1,200 | 10–18 (at 5.0 g/hr) | 4–8 (at 2.8–4.0 g/hr) | 3–4 |
| 2,000 | 18–24+ | 8–12+ (up to 3 days) | 3–4 |
Data source:
Keep in mind that ozone has a half-life of about 30 minutes, meaning half of it converts back to oxygen during that time. Additionally, ozone performs best in temperatures above 60°F, so ensure the room is warm enough for optimal results. Once the treatment is complete, move on to ventilation to ensure the area is safe for re-entry.
Ventilating and Cleaning After Treatment
After the ozone generator shuts down, wait at least 2–4 hours before entering the treated space. Allow an additional 3–4 hours of off-gassing for every hour the machine was running.
"After running an ozone generator, it’s advisable to wait at least two to four hours before re-entering the area, depending on the machine’s settings and the size of the space." – Annette Hinshaw, Business Owner
Once the waiting period is over, open all windows and doors to ventilate the space for at least 30 minutes. Afterward, wipe down hard surfaces like counters, tables, and light switches with a soft cloth and a mild cleaning solution. This step removes any chemical residue left from the oxidation process. Don’t forget to replace your HVAC air filters right away, as ozone can weaken filter materials over time. If you experience any respiratory discomfort while ventilating or cleaning, leave the area immediately and get some fresh air.
Safety Guidelines for Using Ozone Generators
When using ozone generators, it’s critical to follow strict safety measures during and after treatment to minimize health risks.
Health Risks and How to Avoid Overexposure
Ozone can harm lung tissue, leading to symptoms like coughing, chest pain, shortness of breath, and throat irritation. Long-term exposure may cause permanent lung damage and weaken the immune system’s ability to fight respiratory infections.
To protect public health, federal agencies have established strict exposure limits. The FDA restricts ozone output for indoor medical devices to 0.05 ppm, while OSHA and NIOSH set workplace exposure limits at 0.10 ppm over an eight-hour period. To put this in perspective, a study found that a large ozone generator in a 350-square-foot room could reach concentrations of 0.50 to 0.80 ppm – five to ten times above public health limits.
| Organization | Ozone Exposure Standard/Limit |
|---|---|
| FDA | 0.05 ppm (medical devices) |
| OSHA | 0.10 ppm (8-hour average) |
| NIOSH | 0.10 ppm (never to be exceeded) |
| EPA | 0.08 ppm (8-hour average) |
To reduce risks, evacuate the area before using the generator. Ensure all people, pets, and plants are removed. Ozone can also react with chemicals in household items – like new carpets or cleaning products – creating harmful byproducts such as formaldehyde and formic acid, which can irritate the skin and lungs. These dangers highlight the importance of following safety protocols for home ozone use.
Best Practices for Safe Operation
After preparing the area, follow these steps to maintain safety throughout the treatment process. Start by sealing the room – use tape or towels to block gaps in doors and windows and cover HVAC vents to prevent ozone from spreading to other areas. Protect sensitive items by covering or removing them, as ozone can damage rubber, fade plastics, and dull painted surfaces.
If your generator has a built-in timer, use it to avoid entering the room manually. If not, wear a protective mask or cover your nose and mouth with a damp towel before turning the machine off. Keep in mind, ozone generators are not a cure-all for mold issues. For occupied spaces, hydroxyl technology eliminates odors without the same respiratory risks. You must address moisture problems and remove the physical source of mold before starting treatment.
How to Confirm Safe Re-Entry After Treatment
Once the treatment is complete, follow these steps to ensure the area is safe to re-enter. The easiest way to check ozone levels is through the "smell test." A sharp, chlorine-like odor indicates unsafe conditions. The Canadian Centre for Occupational Health and Safety cautions: "Even very low concentrations of ozone can be harmful to the upper respiratory tract and the lungs".
"As a general rule, if you can still smell ozone (a sharp, chlorine-like odor), the space is not yet safe to re-enter. Always ventilate thoroughly and wait until the smell is completely gone before using the room again." – Powerscale
After turning off the generator, open all windows and doors to ventilate the space thoroughly. Use fans to speed up the process. If you notice symptoms like coughing, chest tightness, or a burning sensation in your nose or throat, leave the area immediately – these are signs of unsafe ozone levels. For whole-house treatments, ensure every room is ventilated, as ozone can linger in areas with poor airflow.
Professional Ozone Services from Ozonated Cleaning LLC
Why Choose Professional Ozone Treatment
Professional ozone treatment stands out as a more effective and efficient option compared to DIY methods. Ozonated Cleaning LLC uses advanced ozone and hydroxyl generators for occupied spaces to target organic substances at their molecular level. This process destroys bacteria, viruses, and odors without relying on chemicals. Unlike basic consumer-grade machines, this dual-technology approach ensures odors are eliminated rather than simply masked.
Technicians also account for important environmental factors to ensure the treatment is successful. For example, basement humidity must be kept below 45%, as levels above 50% can reduce the effectiveness of the process. Most ozone treatment times are completed in a single session, and safe re-entry is typically possible within 24 hours.
"Our generators create powerful disinfectants that break down organic substances at the molecular level, destroying bacteria, viruses, and odors." – Ozonated Cleaning LLC
Services Offered by Ozonated Cleaning LLC
Ozonated Cleaning LLC provides odor neutralization services across the Chicagoland area, including Naperville, Aurora, and Elgin, as well as parts of North Western Indiana and South Eastern Wisconsin. Their services are designed to eliminate unpleasant odors in residential spaces, creating a fresh and clean environment. They handle projects ranging from single vehicles to homes as large as 10,000 sq ft.
To achieve optimal results, homeowners are advised to remove mold sources and ensure all interior spaces are open for proper ozone distribution. The process leaves no chemical residues and produces a sterile smell that fades naturally after a few hours of ventilation. Ozonated Cleaning LLC also offers competitive and transparent pricing for their tailored services.
Pricing and Service Features
| Home Size | Price | Key Features | Requirements |
|---|---|---|---|
| 0–600 sq ft | $600 | Single-session treatment, molecular-level odor destruction | Maintain ≤45% basement humidity; remove the mold source |
| 601–1,000 sq ft | $700 | Chemical-free process, 24-hour re-entry time | Clear the area of people, pets, and plants |
| 1,001–2,000 sq ft | $800 | Penetrates all surfaces, leaves no harmful residues | Open all interior doors, cabinets, and drawers prior to treatment |
| 2,001–3,000 sq ft | $900 | Comprehensive coverage, environmentally safe | General cleaning recommended before treatment |
| 3,001 sq ft or larger | Contact for pricing | Custom solutions for larger homes | Extra charges apply for Indiana or Wisconsin |
Prices are subject to change, and additional travel fees may apply for locations outside the standard Chicagoland area.
Conclusion
Ozone generators are effective at neutralizing mold odors by oxidizing volatile organic compounds (VOCs). This oxidation process changes the structure of odor molecules, enabling ozone to reach hidden areas that traditional cleaning methods might overlook. However, it’s important to note that ozone treatment is not a replacement for physically removing mold. Mold can cause allergic reactions, so visible mold must be removed, and sources of moisture must be addressed before considering ozone treatment.
Safety is a critical consideration when working with ozone. Breathing ozone is hazardous, which is why the FDA limits indoor medical device output to 0.05 ppm, and OSHA sets worker exposure limits at 0.10 ppm. Effective ozone treatments often operate at levels 5–10 times higher than these safety thresholds, making it essential to fully evacuate the area during treatment. Following the "3-to-1 rule" – allowing 3 to 4 hours of off-gassing for every hour of treatment – ensures that the ozone has enough time to break down into breathable oxygen before anyone re-enters the space.
Because of these complexities, many homeowners opt for professional services to ensure both safety and effectiveness. Companies like Ozonated Cleaning LLC specialize in handling mold odors with industrial-grade equipment and strict safety protocols. Their certified technicians not only tackle odors but also address common sources of indoor odors and ensure proper ventilation throughout the process, offering a level of thoroughness that’s hard to achieve with consumer-grade devices. For persistent mold odors, professional treatment provides peace of mind and a safer, more reliable solution.
FAQs
Will ozone remove mold or just the smell?
Ozone can destroy mold spores and reduce mold-related odors, but it won’t get rid of visible mold or tackle the underlying causes of mold growth. To fully resolve the issue, you’ll need to physically remove the mold and fix any moisture problems contributing to its development.
How do I know it’s safe to go back inside?
After using an ozone generator, it’s crucial to let the ozone fully break down before re-entering the treated space. Ventilate the area thoroughly to help the ozone revert to oxygen – a process that usually takes anywhere from 30 minutes to several hours. Always stick to the manufacturer’s instructions and ensure the space is well-ventilated to guarantee it’s safe before going back in.
Can ozone damage furniture or electronics?
Prolonged exposure to ozone can harm furniture and electronics. It may cause issues like cracking, fading, rust, or corrosion over time. To minimize risks, always adhere to safety guidelines and avoid using ozone excessively in small spaces or near delicate items.
Recent Comments